You can download the lut from: Google Drive | 百度网盘
I usually shoot Nikon HDR video in H.265 HLG because the workflow is simple: import into Final Cut Pro, export Dolby Vision, and little grading is needed.
Recently I started working more with N-Log, especially for ProRes recording, but I found that ready-made N-Log to HDR HLG LUTs are hard to find. Most LUTs are designed for Rec.709 output, not an HLG HDR workflow. So, with the help of Codex, I wrote a script to generate my own Nikon N-Log to HLG LUT.
This LUT works with Nikon N-Log footage recorded in either H.265 or ProRes, as long as the footage is correctly interpreted in Final Cut Pro.
What the LUT Does
The goal is not to create a stylized look. It is a technical conversion from Nikon N-Log to HLG HDR.
Because Nikon N-Log and Nikon HLG can both be handled in a Rec.2020 / BT.2020 color framework, the LUT mainly remaps luminance while keeping color mostly unchanged.
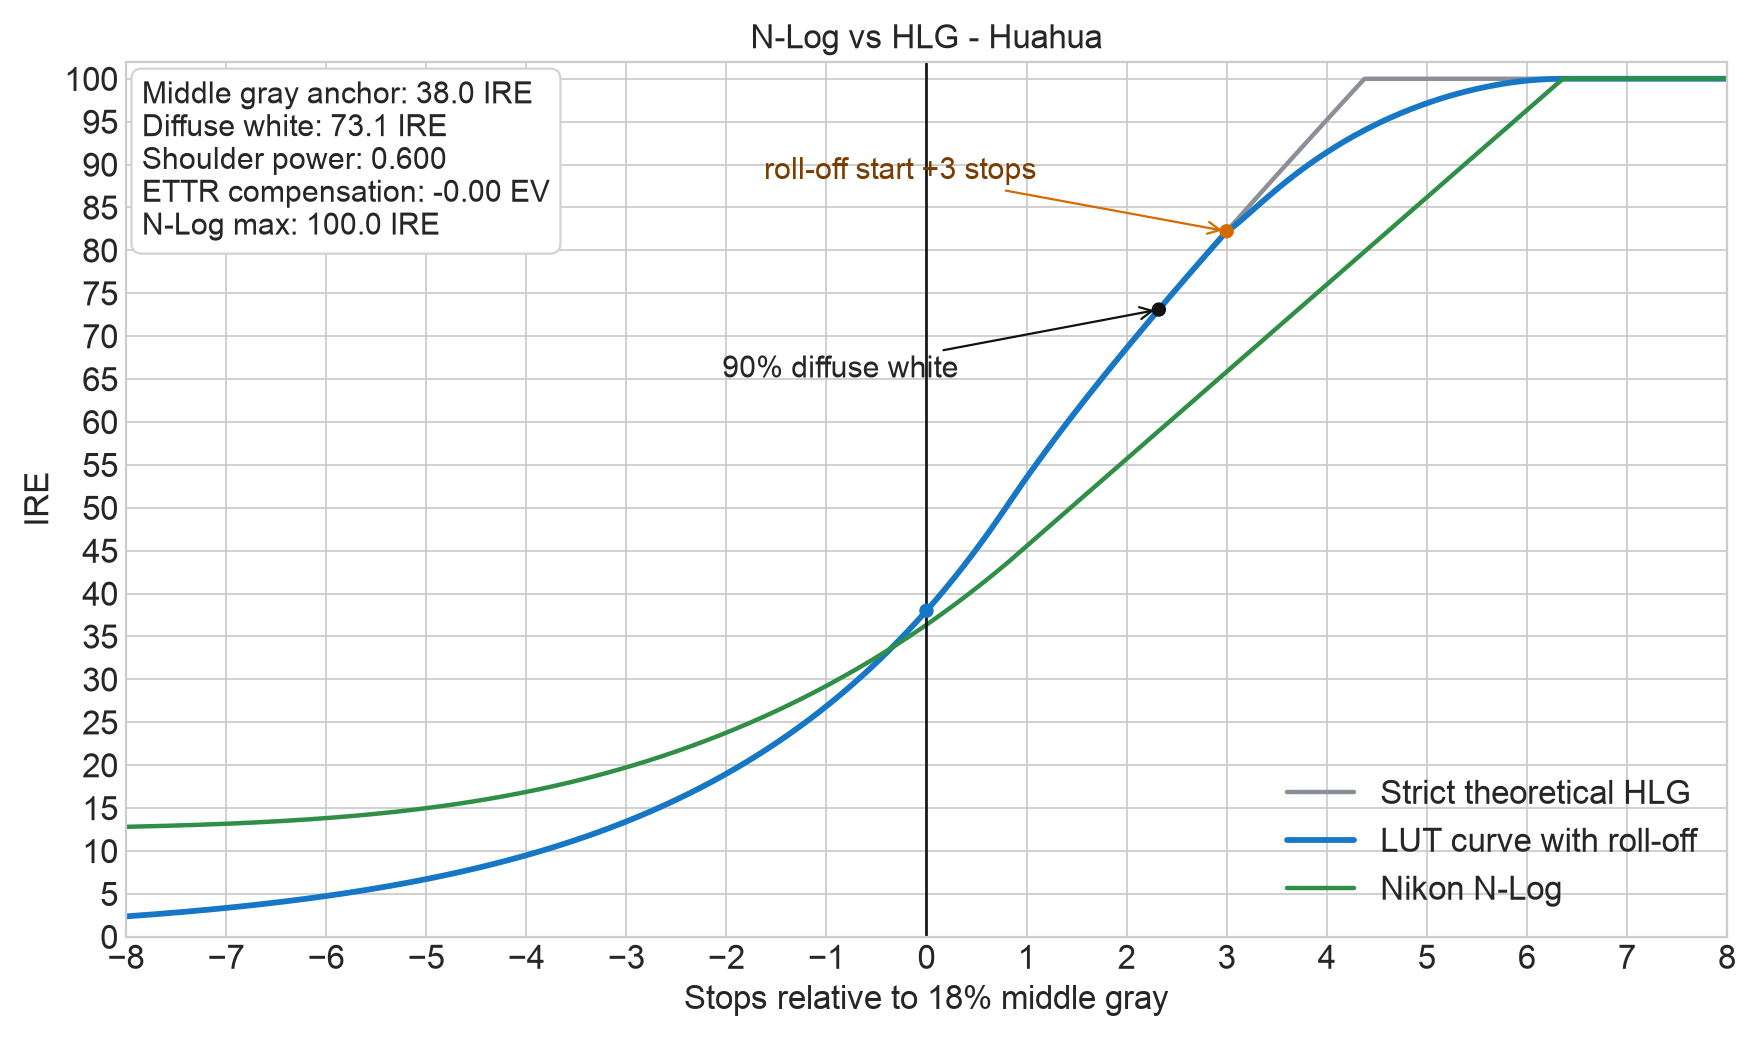
The curve is anchored around middle gray: 18% gray is mapped to about 38 IRE in the HLG output. From shadows through middle gray and up to +3 stops above middle gray, the LUT follows the HLG conversion closely. Above +3 stops, it applies a gentle highlight roll-off to use the upper N-Log range without making highlights look harsh.
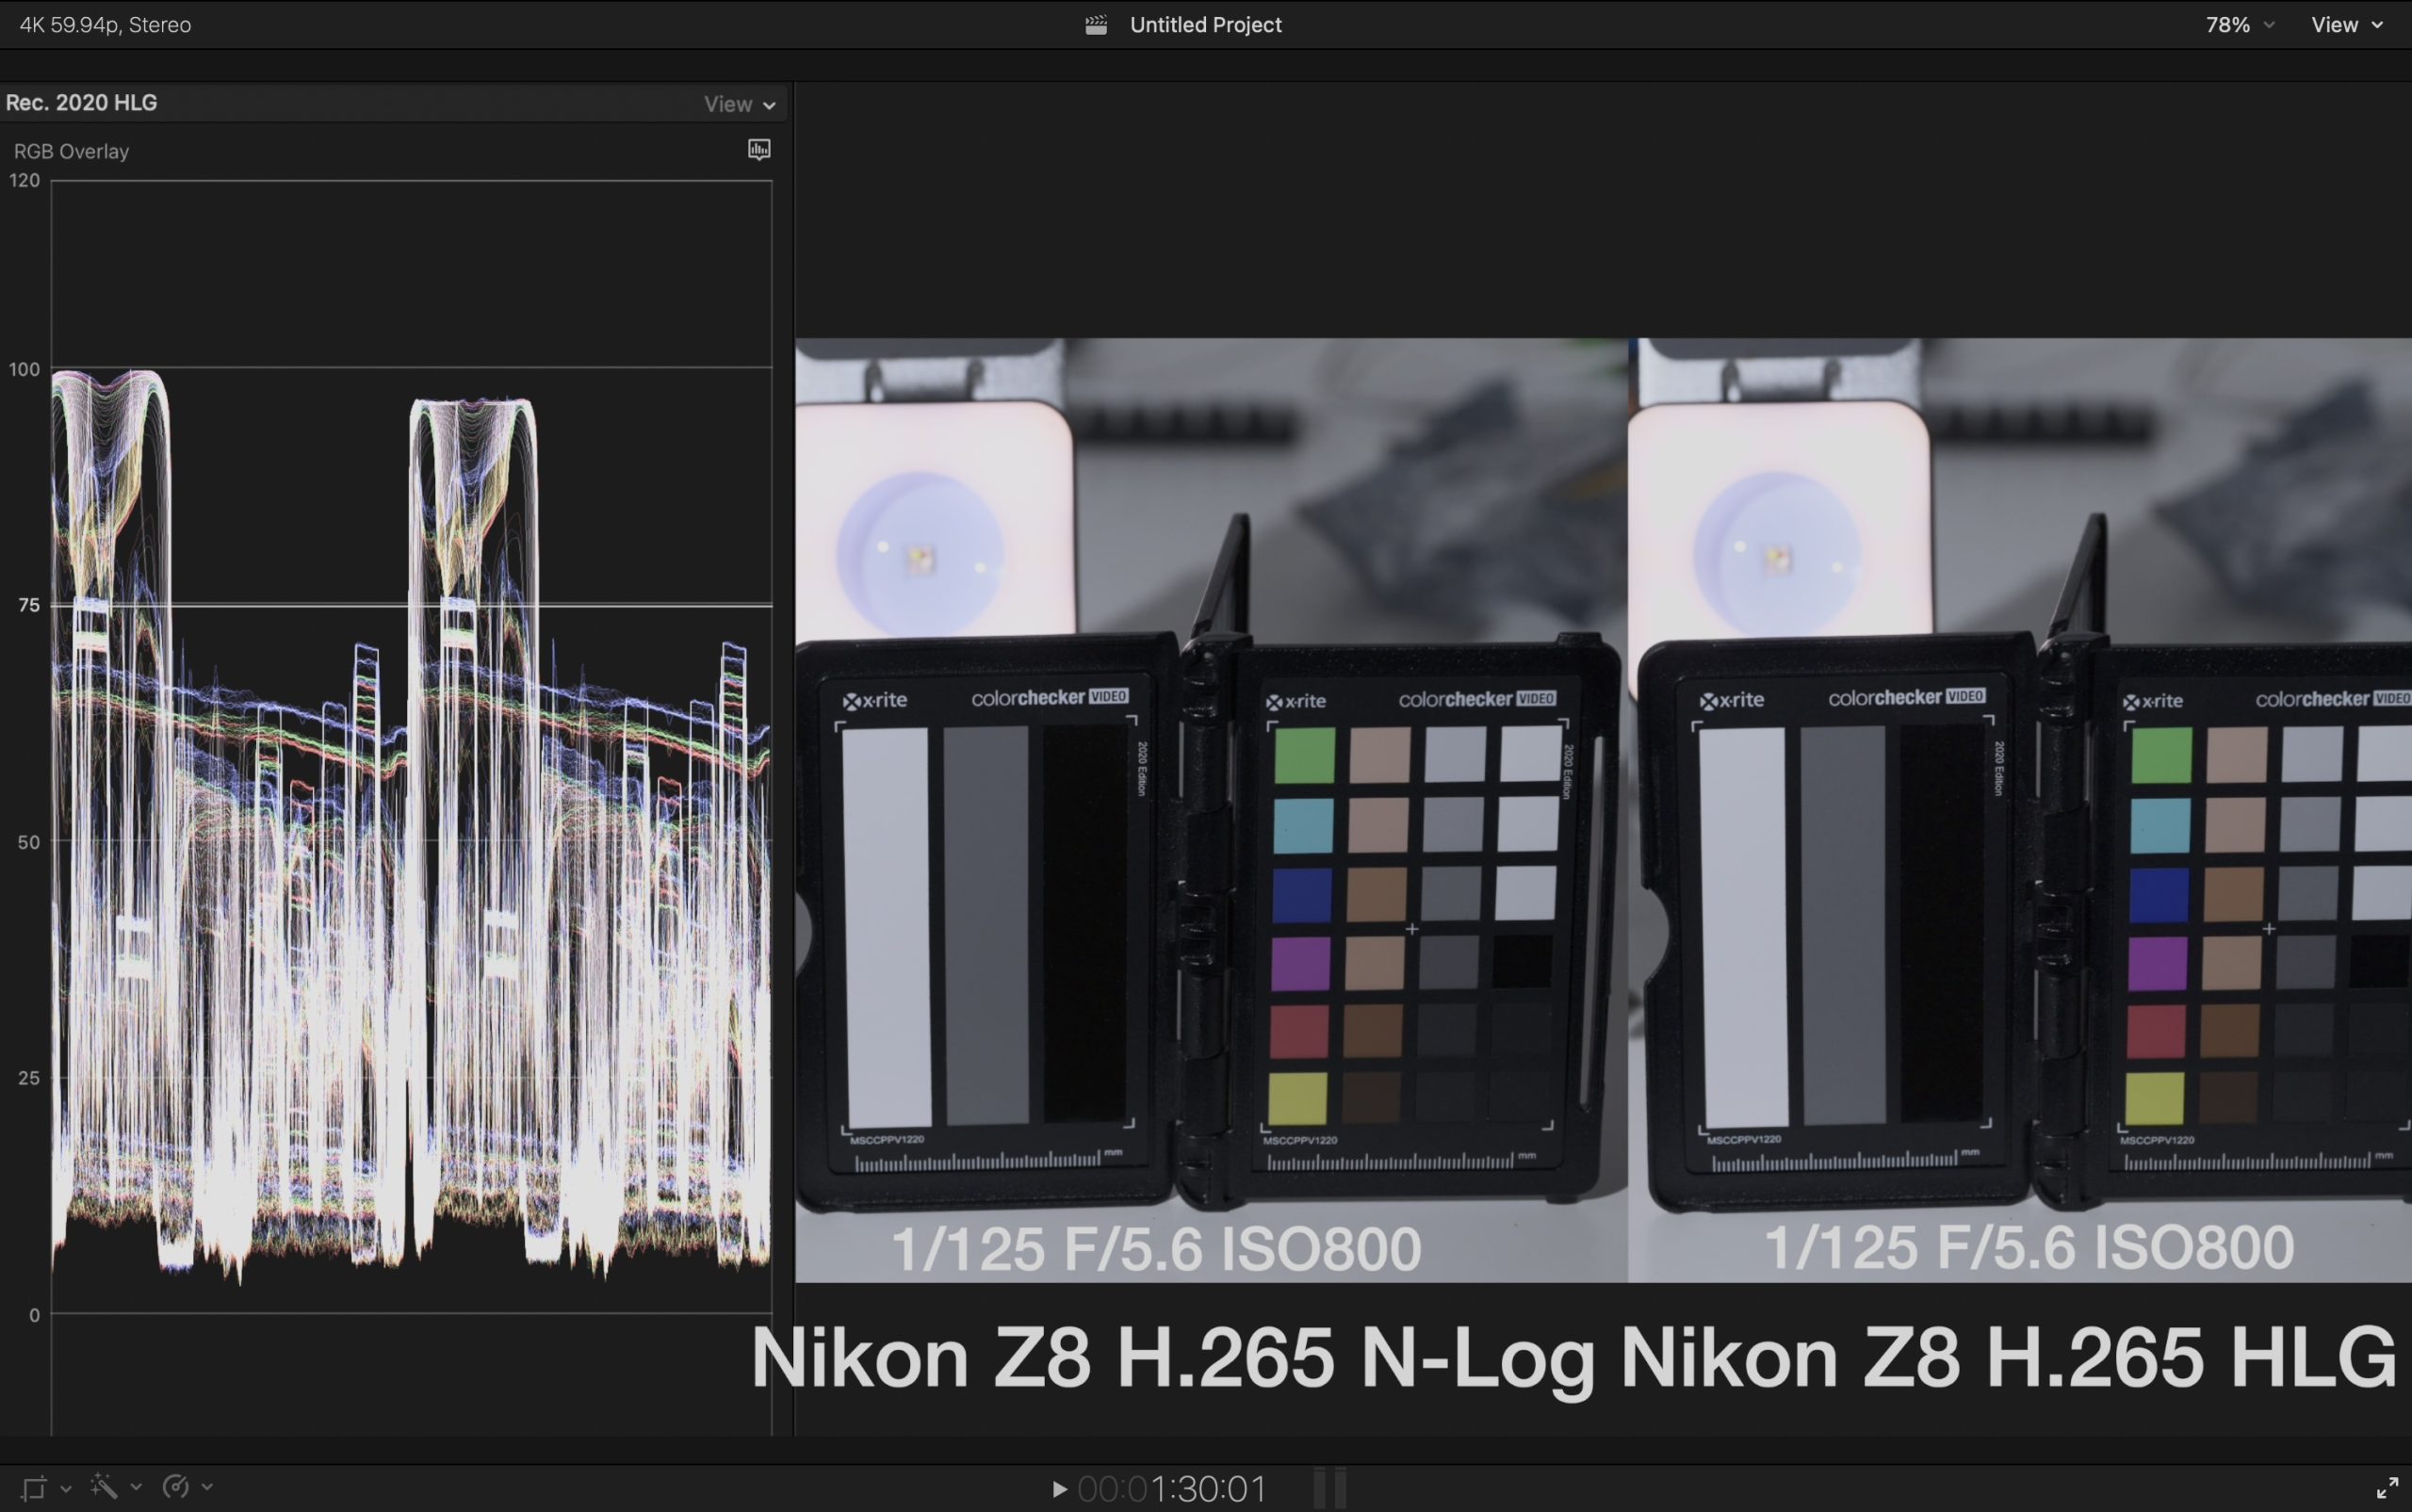
In my tests, with the same ISO, aperture, and shutter speed, N-Log converted with this LUT looks very close to Nikon HLG straight out of camera. Brightness, color, contrast, and midtones match well. The main difference is in the highlights: N-Log produces a fuller waveform, while Nikon HLG compresses highlights earlier.
Exposure
For best results, N-Log should be exposed according to Nikon’s recommendation, with middle gray around 35 IRE on the camera waveform or monitor.
Important Final Cut Pro Setting
In Final Cut Pro, there is one critical setting:
Set the clip’s input color space to Rec.709 when using this LUT.
This may sound counterintuitive, but in my testing, if the input color space is not set this way, FCP’s color management adds an extra transform and the result no longer matches the intended curve.
Conclusion
If you want the fastest HDR workflow, Nikon HLG straight out of camera is still excellent. But if you already shoot N-Log, or want a little more highlight flexibility while staying in an HLG HDR workflow, this LUT is a practical option.
It gives Nikon N-Log a natural HLG look that closely matches Nikon HLG, while preserving smoother highlight transitions.
Nikon N-Log 转 HLG:Final Cut Pro HDR LUT
我平时拍 Nikon HDR,最常用的是 H.265 HLG 直出。这个流程很简单:导入 Final Cut Pro,导出杜比视界,基本不需要复杂调色。
最近我开始更多尝试 N-Log,尤其是 ProRes 录制。但我发现现成的 N-Log 转 HDR HLG LUT 并不好找,大多数 LUT 都是转 Rec.709 的,不适合 HLG HDR 工作流。所以我在 Codex 的帮助下写了一个脚本,生成了这个 Nikon N-Log 转 HLG 的 LUT。
这个 LUT 不管是 H.265 录制的 Nikon N-Log,还是 ProRes 录制的 Nikon N-Log,都可以使用,前提是在 Final Cut Pro 里正确解释素材。
这个 LUT 做了什么
这个 LUT 不是风格化调色,而是一个技术转换:把 Nikon N-Log 转成 HLG HDR。
因为 Nikon N-Log 和 Nikon HLG 都可以放在 Rec.2020 / BT.2020 色彩框架下处理,所以 LUT 主要做亮度曲线映射,颜色基本不动。
曲线以中灰为锚点:18% 中灰在 HLG 输出里映射到约 38 IRE。从暗部到中灰,再到中灰以上 +3 档以内,尽量按照 HLG 转换公式处理。中灰 +3 档以上,开始加入柔和的高光 roll-off,让 N-Log 顶部高光更自然地过渡。
在我的测试里,相同 ISO、光圈和快门下,这个 LUT 转出来的 N-Log 和 Nikon HLG 直出非常接近。亮度、颜色、反差和中间调都能很好匹配。主要区别在高光:N-Log 波形更饱满,而 Nikon HLG 会更早压缩高光。
曝光
为了让 LUT 准确工作,N-Log 建议按照 Nikon 官方推荐曝光,也就是中灰在相机波形或监看里大约落在 35 IRE。
Final Cut Pro 关键设置
在 Final Cut Pro 里用这个 LUT,有一个非常关键的设置:
素材的输入色彩空间要选择 Rec.709。
这听起来有点反直觉,但在我的测试里,如果不这样设置,FCP 的色彩管理会额外叠加转换,结果就不会匹配 LUT 的设计曲线。
总结
如果你想最快做 HDR,Nikon HLG 直出依然很好。但如果你已经拍了 N-Log,或者想在 HLG HDR 工作流里保留一点更舒服的高光余量,这个 LUT 会是一个很实用的选择。
它能把 Nikon N-Log 转成自然、接近 Nikon HLG 直出的 HLG 画面,同时保留更平滑、更饱满的高光过渡。
请尊重作者的劳动成果,转载请注明出处!花花保留对文章/视频的所有权利。
如果您喜欢这篇文章/视频,欢迎您捐赠花花。
If you like my articles / videos, donations are welcome.

huahualeetcode



Be First to Comment